Redesigning a room often feels like a giant puzzle. You have the space, but you might lack the vision to see what it could become. Modern technology solves this by letting you visualize new styles instantly. You can now use tools to ai design my room without hiring an expensive professional. This process saves time and helps you avoid buying furniture that does not fit your style.
Sometimes the images generated by these tools look a bit fuzzy or pixelated. You need to enhance image quality to make sure the details are sharp and clear. High quality visuals help you make better decisions about your home decor. When you can see the texture of a rug or the grain of a wooden table, you feel more confident in your choices.
Step-by-Step Guide to AI Room Design
Step 1: Prepare Your Space
Before you take a photo, you need to clean up the area. AI tools work best when they can see the actual layout of the floor and walls. You do not need to move every single piece of furniture, but you should remove small items like toys, piles of mail, or laundry. A clear space allows the software to understand the dimensions of the room more accurately.
Open all the curtains to let in as much natural light as possible. Natural light helps the AI identify colors and textures better than artificial yellow light. If it is dark outside, turn on all the lights in the room to avoid deep shadows. Shadows can sometimes confuse the software, making it think there is an object where there is actually just a dark spot.
Step 2: Capture the Perfect Photo
The angle of your photo is very important for a good result. Stand in one of the corners of the room to get the widest view possible. Try to hold your phone at chest height and keep it level. If you tilt the camera too far up or down, the walls might look slanted in the final design.
Take several photos from different corners. This gives you more options to choose from when you start the design process. You want to make sure the photo shows the floor, the ceiling, and at least two walls. This perspective helps the AI understand the depth of the room so it can place furniture in a way that looks realistic.
Step 3: Upload and Select Your Style
Once you have a clear photo, upload it to your chosen AI design tool. Most tools will ask you what kind of room it is, such as a bedroom, living room, or kitchen. Selecting the correct room type is vital because it tells the AI what kind of furniture to suggest. You would not want a bed appearing in your dining room design.
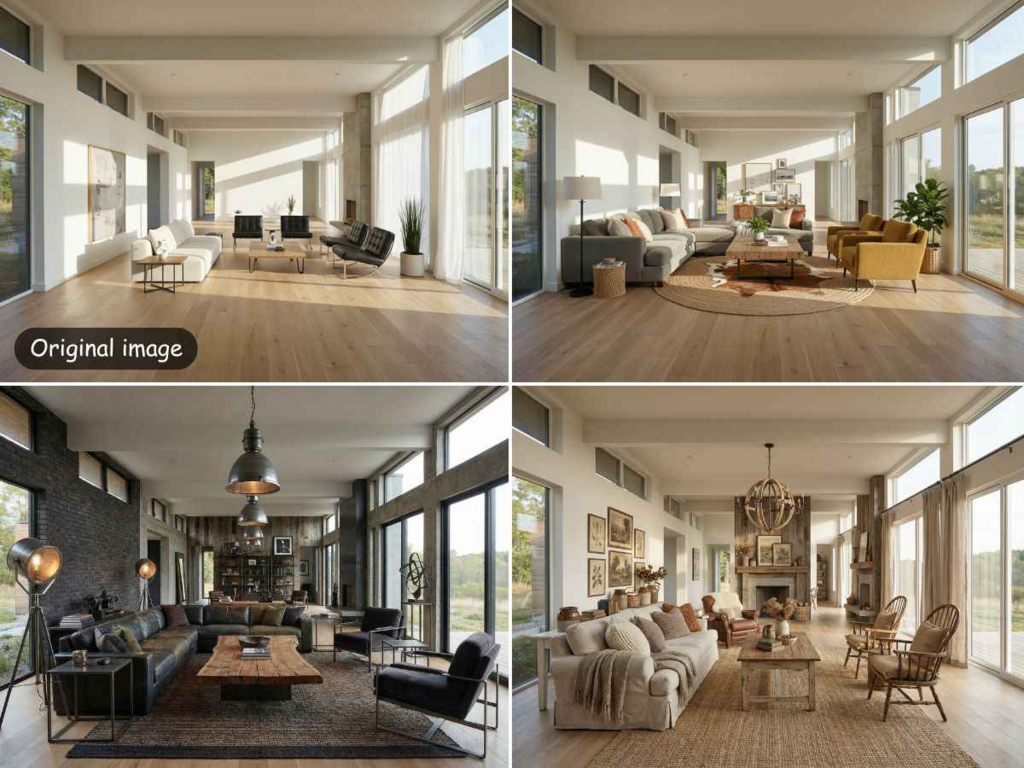
After selecting the room type, you will choose a style. You can pick from popular themes like modern, industrial, or farmhouse. Each style has its own color palette and furniture types. If you are not sure what you like, you can try several different styles to see which one feels right for your home. The AI will then process your photo and overlay the new design on top of your existing layout.
Step 4: Refine the Generated Design
The AI will give you a few different versions of your room. Look through them and see which one catches your eye. Some designs might be very bold, while others are more subtle. You can often adjust the settings to keep some of your original furniture or replace everything entirely.
If you see a specific piece of furniture you like, take note of its shape and color. Even if the AI does not give you a specific brand, you can use the image as a reference when you go shopping. This part of the process is about exploring possibilities that you might not have thought of on your own.
Step 5: Enhance the Final Image
AI generated images are sometimes low in resolution. They might look good on a small phone screen but look blurry on a computer or when printed. To fix this, you should use an enhancement tool. This step adds pixels and sharpens the edges of the furniture and decor in the image.
An enhanced image allows you to zoom in on the details. You can see how a specific lamp looks next to a window or how a rug fits under a coffee table. High resolution images are also easier to share with family members or contractors if you are planning a real renovation. It makes the whole vision feel more professional and tangible.
Tips and Best Practices
To get the most out of these tools, you should follow a few simple rules. First, always use the highest quality photo you can take. A blurry original photo will lead to a blurry AI design. If your phone has a high definition setting, make sure it is turned on before you start snapping pictures of your room.
Second, be consistent with your style choices. If you are designing an open floor plan, try to use the same style for both the living and dining areas. This creates a sense of flow in your home. AI is great at following instructions, so giving it a clear direction will result in a much better final product.
Third, do not be afraid to experiment. The beauty of using AI is that it does not cost anything to try a different look. You can see what your room looks like in bright pink or dark navy blue without ever picking up a paintbrush. Use this freedom to step outside of your comfort zone.
| Item | AI Room Design | Traditional Design |
| Cost | Low or Free | High Professional Fees |
| Time | A Few Minutes | Several Days or Weeks |
| Flexibility | Change Styles Instantly | Hard to Change Once Started |
| Visuals | Instant 3D Renders | Often Requires Manual Sketches |
Common Mistakes to Avoid
One common mistake is taking a photo of a very messy room. If there is a lot of clutter on the floor, the AI might try to turn that clutter into furniture. This leads to strange shapes and unrealistic designs. Spend five minutes tidying up before you take your photo to ensure the software sees the floor clearly.
Another mistake is using photos with very poor lighting. If the room is too dark, the AI cannot distinguish between a wall and a piece of furniture. This results in muddy colors and a lack of detail. Always aim for bright, even lighting to give the software the best chance of success.
People also often forget to check the scale of the furniture. While AI is getting better at understanding space, it can sometimes place a giant sofa in a tiny room. Always double check the measurements of your room before you go out and buy furniture based on an AI design. Use the AI as a visual guide rather than a perfect blueprint.
Finally, avoid using photos with people or pets in them. The AI might try to incorporate them into the design or get confused by their presence. It is best to have a completely empty room, or at least a room where no living beings are moving around while you take the picture.
Conclusion
Using AI to design your home is a fun and efficient way to refresh your living space. It allows you to see the potential of a room without the stress of manual planning. By following a simple step-by-step process, you can turn a basic photo into a professional looking interior design concept.
Remember that the quality of your input determines the quality of your output. Start with a clean room and good lighting. Use an enhancement tool to make sure your final images are crisp and clear. With these tools at your disposal, you can create the home of your dreams with just a few clicks.